Archives For seasonal decor

My friend Laurie inspired me the other day when she mentioned that she was planning to make some holiday pillows using this fabric. At first glance it’s your typical cheesy snowman motif, but upon closer inspection it’s clear that these snowpeople are hipsters. I mean, come on, they’re wearing scarves and riding bikes! I have scaled my holiday decor waaaay back in recent years, but the hipster snowman fabric inspired me to see what else is out there.

modern holiday fabric (570x569)

Unruly Reindeer, Christmas Staching Snowmen, Yule Critters

Zoom Zoom, Retro Ornaments, Canopy Stripe

Play Dot, Deck the Halls, Tree Trimmers

Whether your style is modern classic or campy kitsch, take a look around and see if you can’t find something that suits your fancy. My favorite spots to look for fabric online are Etsy, Fabric.com, Joann’s, and Tonic Living. And what to do with it? You could display it in an embroidery hoop or stapled over a canvas, make a cover to slip over any toss pillow you already have, make a table runner or placemats, or even use it to wrap up a couple of special gifts. The possibilities are limited only by your imagination.

Full disclosure: I probably will not do much holiday crafting this year. Honestly, I’m debating even getting a tree-it seems like a recipe for disaster with a toddler who’s into everything, but I haven’t written it off entirely yet. Thoughts?

Share

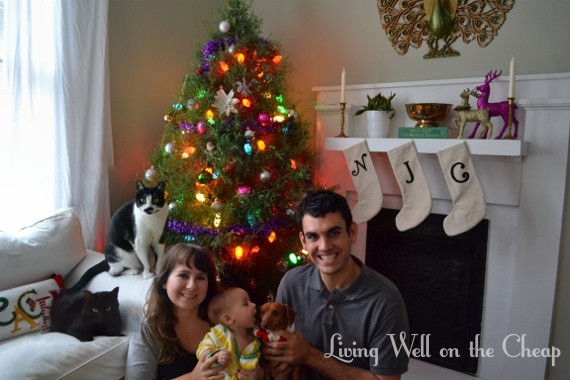
I made Jack’s Halloween costume yesterday! It cost me almost nothing and was super easy.

097 (570x380)

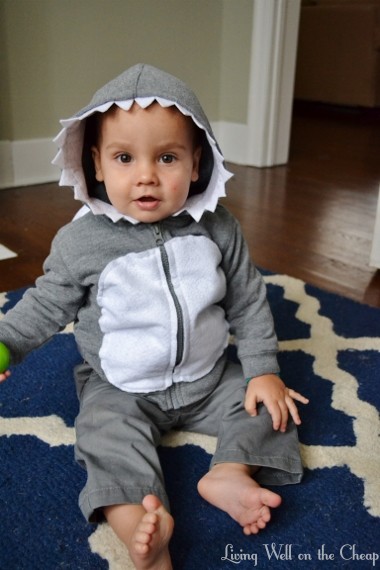
Please tell me it’s obvious that he’s a shark.

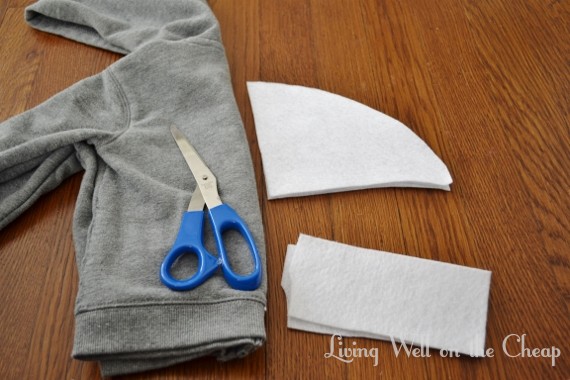
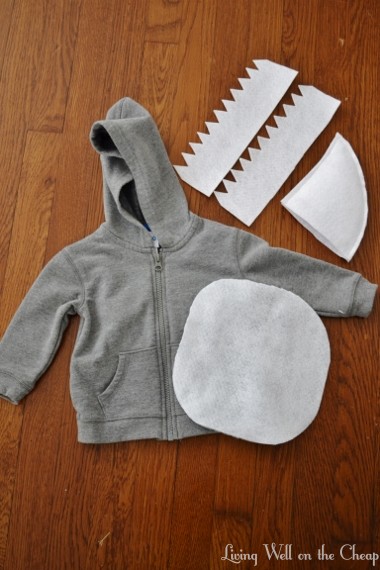
I started out with this gray hoodie from Target ($9) and a few sheets of white felt that I already had (originally $1.25 total).

002 (570x380)

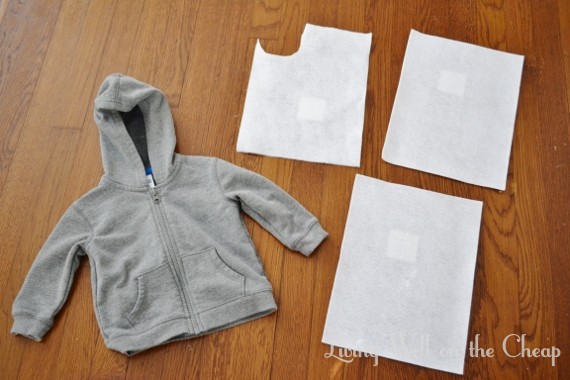
The sheet that already had a piece cut out was thinner and softer and, according to the sticker on the back, only 25 cents. The other two were more stiff, had glitter on one side, and were 2/$1. They’ve all been hanging out in my craft stash for the better part of three years, as you can see by the label!

003 (379x570)

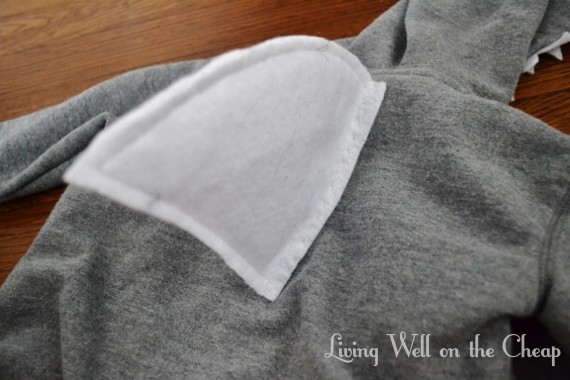
First, I cut an oval out of the soft felt to serve as the shark’s belly.

008 (380x570)

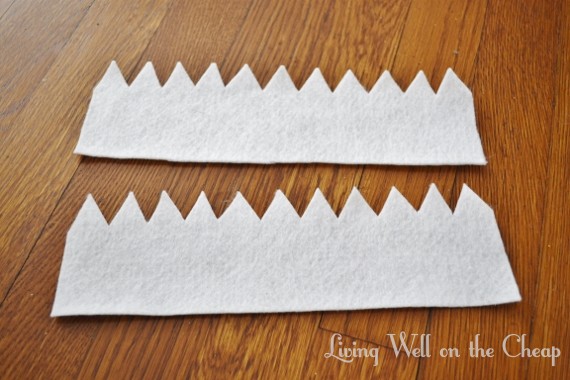
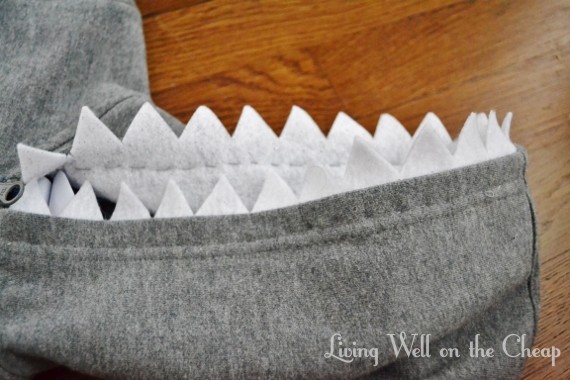
Then, I cut two strips from the stiff felt and used a sharp pair of scissors to cut out triangle shapes.

015 (570x380)

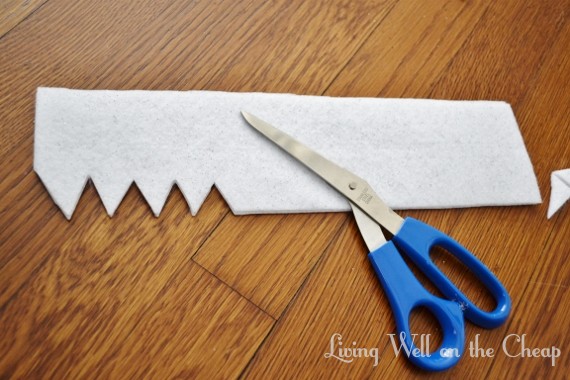
I trimmed them to length and, voila, shark teeth.

018 (570x380)

I folded the remaining sheet of felt in half (glitter sides together) and sketched out the shape of a shark fin. I was a little nervous about getting it right so I googled it and found a few examples online to emulate.

021 (380x570)

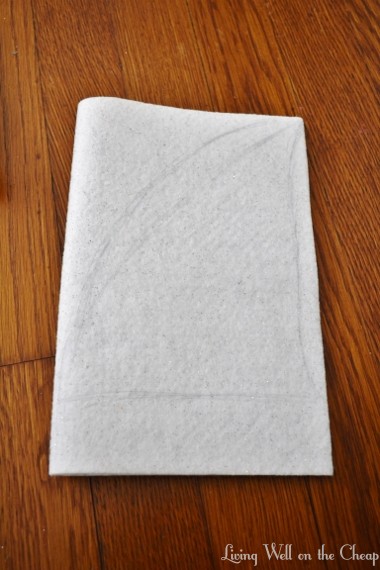
Once I’d cut out my fin I actually trimmed it down to a considerably smaller size, so you could definitely get a much bigger fin out of one sheet of felt if you felt so inclined.

024 (570x380)

I top-stitched around the two sides of the fin, leaving the bottom open and stuffing the inside with a few scraps. I actually stopped my stitches a few centimeters from the bottom of the fin so that the two sides could splay out and attach to the hoodie (this may make more sense when you see it attached). If you don’t have a sewing machine you could totally stitch the fin up by hand or even use glue.

029 (380x570)

Next step: sew on the shark belly. My first attempt left something to be desired.

032 (380x570)

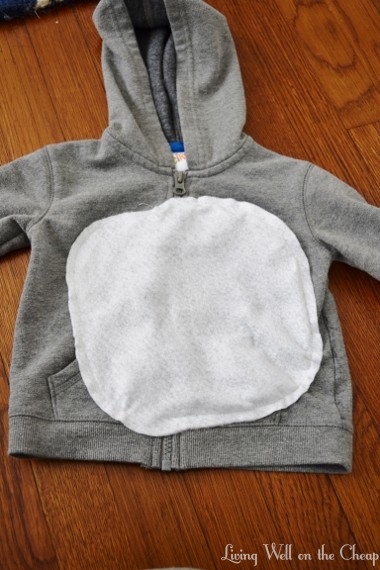
My idea was to sew on the belly, then cut a slit down the middle to accommodate the zipper. But when I saw how lopsided things had gotten I decided to try again with pins holding it in place, in which case I might as well go ahead and cut the zipper free right then. It was a lot easier to sew with the hoodie unzipped.

038 (380x570)

I actually laughed out loud when I saw what it looked like the second time. I mean, come on! What did I do wrong this time?

041 (380x570)

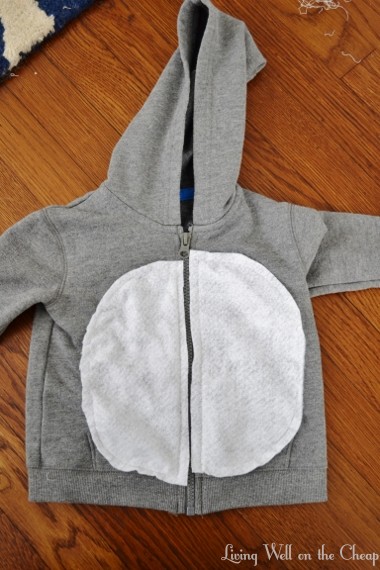
But no worries, a little strategic trimming around the edges got things looking much more symmetrical.

042 (380x570)

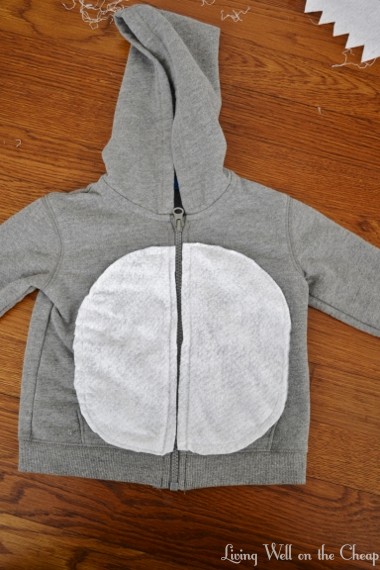
I’d had so much trouble with the belly that I decided to stitch the teeth and fin by hand. Bonus: this way I didn’t have to re-thread my machine with gray thread. This was an easy task to knock out while watching The New Girl with Nick after Jack was in bed.

043 (570x380)

044 (570x380)

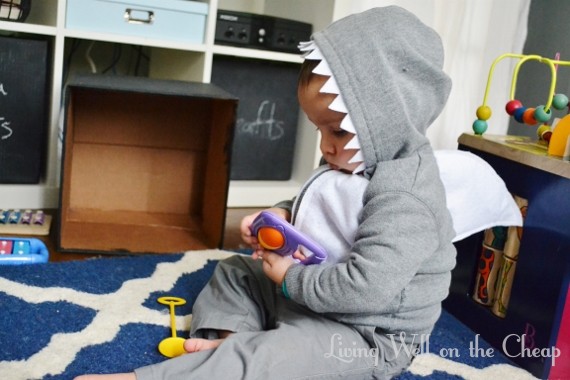
I was thrilled when I saw how cute it looked on Jack! Rarely does a project actually turn out like I’d hoped, so this is a special treat.

047 (380x570)

I paired the hoodie with a pair of gray pants that we already had, but I think it would look just as cute with jeans, sweatpants, whatever.

049 (380x570)

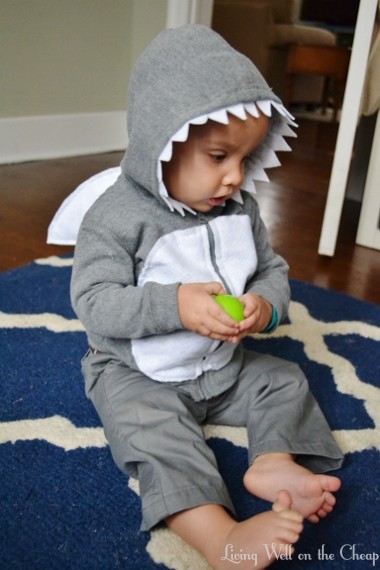
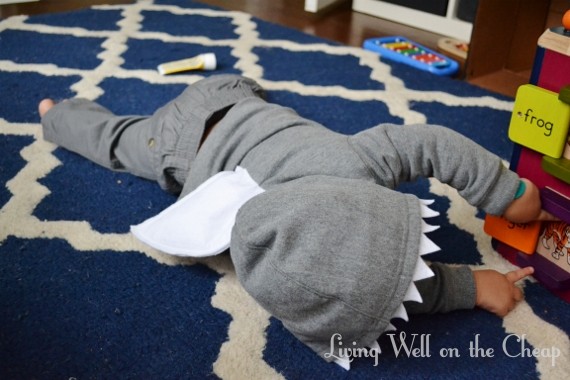
As you can see, it’s plenty comfortable for playing. When he lays on his back the fin just flips over to the side.

054 (570x380)

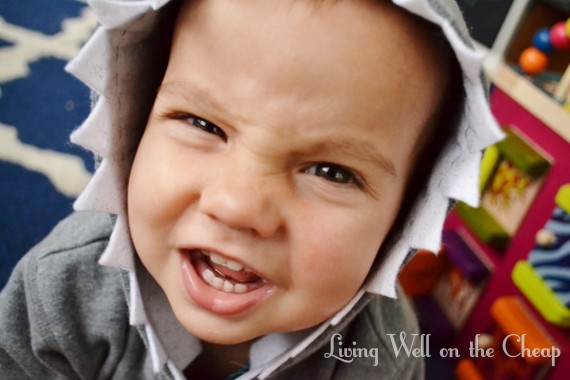
This is his vicious face: “I am an apex predator, now fetch me a snack!”

056 (570x380)

Using a gray hoodie as the basis for the costume made it really easy to DIY. I’ve had this on my to-do list for weeks and kept putting it off, thinking it would take me a whole afternoon, but even with the trouble I had sewing the belly on it still took me under an hour total (including the hand-stitching I did in front of the TV). I’m thinking of ripping out the stitches and continuing to use the jacket as a regular piece of clothing after Halloween has come and gone, but I bought it in size 12 months and I’m not sure how much longer it will fit him, so we’ll see. I just can’t get over how stinking cute he looks in it.

This is a costume that I think would work equally well for boys and girls (just add some pink or glitter if it’s not girly enough for you, but I tend to prefer gender neutral stuff anyway). I always hate the idea of spending money on a costume that is poorly made, probably uncomfortable, and will never be worn again, so this one’s definitely a winner in my book! If you’re not much for sewing you could definitely use hot glue or some other adhesive, but stitches are easier to rip out so that the hoodie can resume normal use. You could use the same concept (hoodie + felt or other embellishments) to make all kinds of stuff, like a cat, monster, dinosaur, little red riding hood, unicorn, frog, etc.. The possibilities are endless!

Share

I have never been one for decking my entire house in seasonal decor. I’m totally not knocking those who do, I’m just not nearly organized or energetic enough to manage that kind of thing year round. Even my Christmas decorations have been on the understated side the last two years. But I do like to change up a few things here and there to acknowledge the time of year, even if I’m the only one who notices. All of my “fall decor” can be spotted in the photo below (pantsless baby and Halloween cat included).You can see also that I’ve been making some progress in general decorating-I got a storage ottoman to slide under the sewing table and hung a few more frames on the wall.

003 (570x380)

On the sewing table: a metal pumpkin that I bought at my first ever estate sale and a short cylinder vase full of pinecones I found in my parents’ yard.

026 (570x380)

On the bookshelf: the mason jar lid pumpkin that I made last year and a couple of leftover pinecones tossed into the silver bowl that was already there. The cylinder vase was full but it seemed a shame to put the remaining pinecones into a drawer, so here they sit for now.

021 (378x570)

And lastly, Halloween Cat! Actually, her name is Sheila, and she’s difficult to catch on camera because she avoids Jack and Juliet (both of whom are almost always on my heels). She is very sweet and well-behaved and I love her.

045 (570x380)

I don’t even have a pumpkin on my porch yet! We were going to hit up a local pumpkin patch on Saturday but since it was expected to storm all weekend we postponed, then of course the weather was gorgeous most of the time. Maybe next weekend!

Share

It’s that time of year. Folks are starting to think about their family photos for the holiday season. If you’re like me you don’t actually get around to it until December, but if you’re planning on having photos taken sooner then props to you. I know not everyone does holiday photos, but for some reason Nick and I started taking them years ago (even if it was just a friend snapping a pic with an iPhone) and I love that it’s become a tradition for us. After we sent out last year’s photo we got lots of compliments on how impressive it was to get all of our pets in there together. If you have any experience with cats you know that they are not exactly obedient creatures.

family cropped (570x407)

My secret: they’re photoshopped. I don’t actually own photoshop and have no idea how to use it, so I’m just using “photoshopped” as a verb there to describe what I did with the photo editing software that came with my laptop (Windows Live Photo Gallery). After many, many “blooper” shots trying to get all three humans and three pets into one photo, we gave up and took one with just us and Juliet.

060 (2) (570x380)

I left my tripod in the same spot, spent a few minutes soothing Pistachio from the trauma of the botched photo shoot, and then perched her on the arm of the couch and ran and snapped a picture before she could move.

005 (570x380)

Then I repeated with Sheila. You can see by her tail that she was still a little bitter over the whole experience., but I called it good enough.

016 (570x380)

Here’s where the magic happens. I went on my computer and picked out the best photos, then opened Windows Live Photo Gallery and selected the two cat pictures (I recreated the process and took screen shots to show y’all for this post), then clicked “photo fuse” near the too left of the screen. You can see my mouse over it in the screenshot below.

Untitled1 (570x320)

It pulled up the picture of Pistachio as the main image. Then all I had to do was select the blank space where I knew Sheila was hiding in the other photo, and it asked me which one I liked best. I chose Sheila.

Untitled2 (570x320)

Bam. Two cats, one photo. And Sheila’s angry tail disappeared in the process.

cats (570x380)

I saved that photo, then fused it with the picture of me, Nick, and Jack. I brought the cats in one at a time by drawing a rectangle around where they sat. It was just luck that Pistachio didn’t mess up my hair, since they overlapped a bit.

Untitled3 (570x320)

untitled4 (570x320)

Ta-da!!!

family (570x380)

The letters on the pillow behind Sheila were a little messy from all that editing, so I cropped it before adjusting the lighting and colors a bit. If you look closely you can see that the curtain behind/above Pistachio is messed up a bit, but I don’t think anyone would notice unless they were looking for it.

family cropped (570x407)

So there ya go! An easy tip to get unruly pets or children into photos with software that I think comes standard on Windows computers these days. I hope y’all each had a lovely weekend. We are back from Austin and ready to get back into the swing of things. Well, I am, at least. Poor Nick was a little bummed about having to go back to work after an entire week off. He and Jack enjoyed spending so much time together. I know he’ll be counting down the days until next weekend!

Share