Archives For with a little help from my friends

I’ve been working on this table on and off for nearly two months and am proud to say that with some help from a professional metalsmith I can finally call it done. It counts as DIY if someone I know did it, right? I considered sparing you the details of all my failed attempts to do it myself, but decided there was no sense in sugarcoating it. Let’s start with the two steps I actually got right. First, I bought an 18″ wood round at Lowe’s for under $10. I sanded it down a bit and then gave it one thin coat of white paint. I wanted the grain to show through for a whitewashed effect.

134 (570x380)

I also picked up a 10 foot copper pipe, eight endcaps, and a pipe cutter. I cut the pipe into four 28″ lengths. It was my first time using a pipe cutter but it was super easy. It didn’t come with any instructions so I YouTube’d it. You just mark where you want to cut, tighten the rotary blade against the pipe, and twist, tightening periodically as you go. I honestly don’t remember how much I spent on these supplies but I feel like it was under $30.

137 (570x380)

I made a series of complicated marks that I didn’t really understand to try to figure out where to attach my four legs. My dream was to have a tripod table, but I couldn’t figure out how to cut and attach the pipes at an angle so my plan was to go four-legged.

148 (570x380)

But it didn’t matter because my plan to attach the pipe caps with screws and then slip the legs into them didn’t work anyway. I couldn’t get the caps to attach securely. So then I used a template (found here) to drill angled holes for my pipes using a spade bit. I couldn’t find a bit that was the exact outside diameter of the 3/4″ pipe and my table wasn’t thick enough to drill deep holes anyway, so my plan was to just create the angle with the drill bit and then attach the caps with epoxy, slipping the pipes into them after the epoxy had cured.

008 (570x380)

026 (570x380)

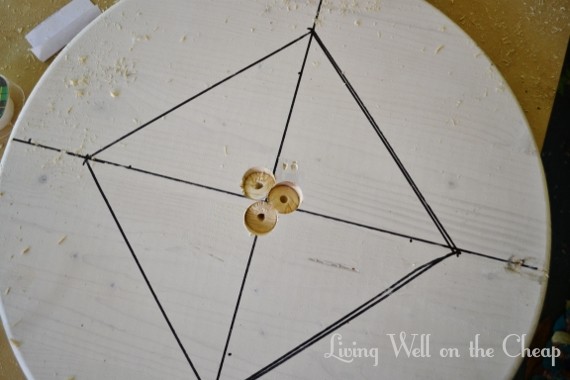
It didn’t work. My table was crooked.

015 (570x371)

So then I went back to the four-leg approach, trying this time to attach the caps with epoxy instead of screws.

036 (570x380)

I didn’t even snap a photo of the outcome. It was that bad. At this point I finally took my friend Cassie’s husband Nic up on the offer he’d made weeks ago to help. He’s a professional metalsmith who actually enjoys this kind of thing. On Saturday we went to the shop that he shares with a couple of friends (also professionals). It was like a giant, metal-filled man cave. This was baby Olive’s first trip to the shop! She seemed to like it.

2013-11-09 14.09.53 (570x428)

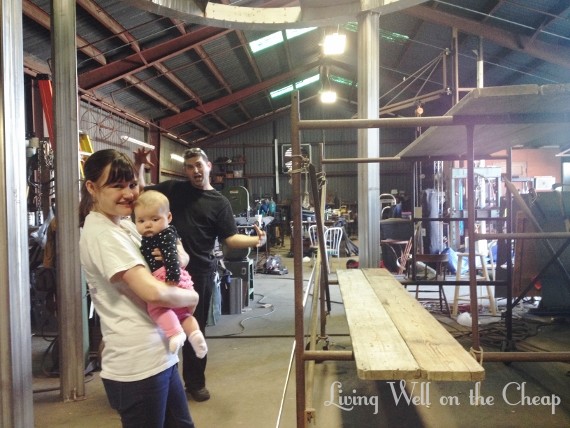
Check out this welding cart. The other two guys at the shop do a lot of artsy stuff, while Nic is more into functional pieces.

2013-11-09 14.12.45 (428x570)

This is Nic’s corner of the whole place. He maintains that he does not have a hoarding problem.

2013-11-09 14.13.21 (570x428)

2013-11-09 14.41.51-2 (428x570)

He said he could make the tripod idea work and I was thrilled. He inserted a metal rod into each of the three pipes and screwed it into place.

2013-11-09 15.56.22 (428x570)

Then he used a compass to mark the diameter of the tabletop and used some kind of math to figure out how to space the legs equally around the perimeter. He leaned the legs together into a tripod shape, placed a square metal plate on top, checked that it was level, and then broke out the torch to weld it all together. He made me put on a mask just to take this photo.

2013-11-09 16.09.38-3 (428x570)

He attached the metal plate to the underside of the table, popped a copper cap onto the bottom of each leg and bam, he was done! It actually took a couple of hours but I got to hang out with Cassie and Olive the whole time so it was fun.

2013-11-09 16.28.37 HDR (428x570)

2013-11-12 08.09.51 (428x570)

Back home, I gently sanded the printed letters and numbers from the pipes and gave them a light polish with some ketchup (a trick I gleaned from that post linked above with the drilling template). I wanted to keep some of the patina the metal had gotten from sitting on my porch for two months.

017 (2) (380x570)

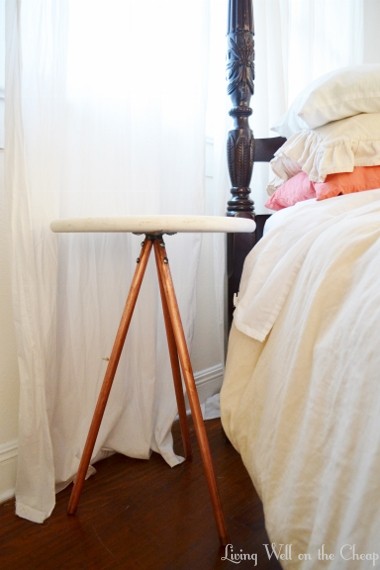
It’s a happy accident that it ended up almost the exact same height as the other nightstand. I don’t feel like my bed is that tall but it’s nearly impossible to find nightstands that aren’t super short.

036 (2) (570x407)

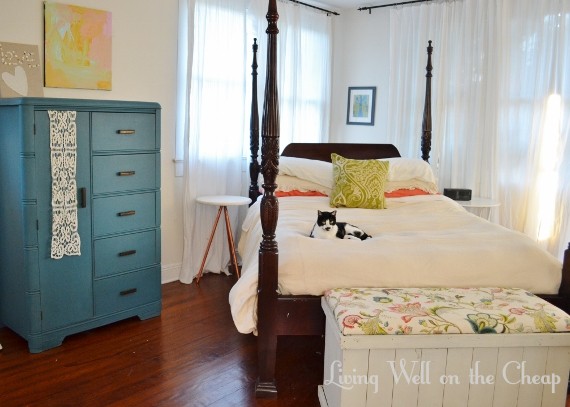
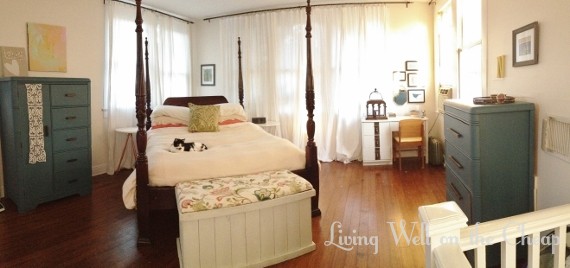
It’s really hard to get a good photograph of our room, so I took this panoramic shot with my iPhone to give you an idea of the layout. I didn’t think I would like having the bed at an angle like this but it’s actually working out really well.

2013-11-10 16.38.26 (570x268)

I can’t get over what a great job Nic did on the table. It’s super sturdy and exactly what I’d imagined. If you’re local and need some metal work done let me know and I can put you in touch with him. He’s always taking on side jobs for fun. His specialty is these awesome firepits with fleur-de-lis cutouts that he makes around the holidays for $400 each. I can’t wait to break out the s’mores in their backyard as soon as it gets a little colder!

Share

You may remember that a few weeks ago I bought a painting from my friend Bethany’s son.I mentioned then that I hoped to share some photos soon of Bethany’s home, and today’s the day! I took Jack over there for a play date yesterday and snapped away. Bethany lives on the other side of town from me (conveniently located near my favorite Target!) and I got almost all the way there before realizing I’d forgotten my camera. I turned around and rushed back, arriving 15 minutes late with camera in hand only to realize I was sans memory card. It was not my lucky day, but I chalked it up to first world problems and took pictures with my iPhone instead. Behold, three charming and beautiful children: Jack, 5; Indigo, 2; and of my course my Jack, 14 months.

1

It’s really hard to create a home that is both kid-friendly and pleasing to the grown-up eye, but Bethany has hit the mark in my opinion. Their living room is fun and comfortable for all ages.

2

The grasscloth wallpaper came with the house, amazingly. That sort of thing is not common in Louisiana.

4

Bethany’s husband built this sofa table from 2x8s, using wood glue and screws to attach the joints and then whitewashing it.

6

A lot of the art here was done by Bethany. I think it’s so wonderful that her kids are growing up surrounded by interesting things.

7

The blue and green bunting across the huge wall of windows is so cool. And how luxurious is it that Bethany can sit on the sofa and watch her kids play out back? Jack isn’t old enough to play outside alone yet but I was still really jealous.

Bethany pulled this old entertainment center from a curbside and she and her husband turned it into a play kitchen for the kids.

See? More kid stuff and grown up stuff happily coexisting. I love it.

When Bethany and Jeremy bought the house the entire foyer and front living/dining area were painted the pale yellow that you see on the door. Trim, walls, everything. I think it’s much better taken in this smaller dose.

This formal living room is used as a work/school zone with the dining area just beyond. They built the work table from pallets that the dining table was shipped on, then topped it with a piece of glass for a smooth work surface.

12

13

15

This was an old-school corkboard that Bethany covered in funky fabric and now uses as an art inspiration board, with a little bit of homeschooling brought to you by the letter C.

This chest of drawers and the blue one in the living room are an identical pair purchased secondhand on separate occasions. The one in the living room serves as a media console, this one as a buffet of sorts. She refinished them both, obvs.

The art installment on the wall is made from paper plates (by Bethany, of course).

20

Some sweet potatoes sprouted in their pantry and Bethany decided to turn it into a teachable moment by placing them in a sunny area to continue growing. I love that they look sort of sculptural and rustic.

Every time I visit Bethany’s home I leave inspired to make my own home a little more fun. And if you want to see more of her kids’ awesome artwork you can check out her new Etsy shop. I hope you all were as inspired as I was, and that you each have a lovely weekend. Thanks for reading!

Share

Happy Tuesday, party people! Instead of droning on with the same old same old what’s-going-on-in-my-life, I’ll be talking today about my friend Christa and her blue-tiled kitchen. True story: I met Christa volunteering at a suicide hotline (that’s also how I met my friend Cassie, and a handful of other wonderful people in my life). Christa and her boyfriend James bought their house in 2011 from James’ grandparents (whom I also know from The Phone, shout out to Ms. Betty!). Ms. Betty and her husband owned it for more than twenty years before downsizing to a smaller condo, and now Christa and James are slowly but surely trying to make it their own. One of the big things holding them back is the kitchen. It’s centrally located and sports a blue-tiled floor. Without the budget to overhaul the floor, Christa feels paralyzed in decorating not only the kitchen but also the adjacent living room and other surrounding areas.

911925_10151551426486506_245980055_n (570x426)

909217_10151551426481506_2119644551_n (570x426)

blue tile floor (426x570)

I scoured Pinterest and the internet at large for images of rooms with strong hits of blue, and what appealed to me the most was seeing it paired with muted earth tones and lots of neutrals.

flickr (445x570)

InStyle

source2 (550x550)

BHG

paper couture (380x570)

Paper Couture

source (320x320)

source unknown (pinterest)

polyvore (570x570)

Polyvore

source3 (384x570)

original source unknown (pinterest)

Here’s what I would do if it was my kitchen:

christa kitchen moodboard (436x570)

1. Benjamin Moore Blue Echo / 2. Benjamin Moore Mink / 3. Benjamin Moore Cream Fleece / 4. Thomas Paul Dahlia Aegean / 5. Crate & Barrel Olivewood Nibble Bowl / 6. Crate & Barrel Potted Kalenchoe / 7. Target Whittier Elite Rectangular Platter / 8. Fresh lemons (source) / 9. Crate & Barrel Turner Black Barstool / 10. Target Threshold Fairfield Stripe Rug - Natural

Christa already said that she wants to paint the cabinets a deep espresso brown, and I think that pairing them with cream on the walls would be really lovely. Both of these shades jive nicely with the blue floors, which Christa said were a pretty close match to BM Blue Echo. With so much color on the floor I’d try hard to keep the rest of the room airy and neutral. Some fresh (or fake) lemons and herbs growing in white ceramic pots would bring in color while maintaining the earthy vibe, and a window treatment using the same fabric I used for my counter skirt would carry the same feel into the breakfast nook. Black barstools add contrast (though I’d search for a cheaper option than these, or maybe even paint some secondhand stools from craigslist or the thrift store. I’d also probably paint the island a lighter color (possibly BM Cream Silk), but that’s a personal choice. The wood trim can shine in this color scheme instead of screaming “I’m outdated!” and a neutral runner on the floor brings in more texture and earthy color (jute is another option that’s just as earthy and easier to keep clean). White dishware is easy to collect secondhand and will still fit right in if Christa decides to change the rest of the room up again later.

Sometimes it can be hard working around expensive-to-replace elements like flooring, counters, and upholstered furniture, but it’s totally doable and the result can be a really fun and eclectic look. I actually think that having limits like a budget or a blue tiled floor can be great in that they drive creativity. Having buckets of money might even take the fun out of decorating for me, haha.

I hope you like my ideas, Christa, and at the same time it’s okay if you don’t! We all have different styles and tastes, which is why the kitchen that made Ms. Betty happy for twenty years can be so unappealing to someone young enough to be her granddaughter.

Share

Y’all remember my friend Sarah, right? She bought her first place (a condo) in Houston last year and has been sending me updates as she works on making it her own. I think it’s fun to feature other peoples’ projects here on the blog now and again, just to mix it up and share different styles and techniques. And since Nick and I are totally intimidated by lighting upgrades after replacing the light above our stairs, here’s a chance for any of you who are in the market for new lighting to see the magic Sarah worked in her kitchen and dining area. Without further adieu, I give you Sarah:

Hi LWOTC readers! I just wanted to stop by and tell you about a recent lighting update I did in my condo. When I moved in there was a basic pendant in the kitchen that wasn’t really my style. And the light fixture over the kitchen table had been sealed with a light outlet cover. Here’s a picture of the kitchen pendant when I first moved in.

Before (570x416)

I started looking for a light fixture for over my dining table, keeping in mind that it would probably cause me to replace the other pendant. I found this beautiful mercury glass pendant at West Elm for $70. The one online is $99, but it includes the pendant assembly kit and my local store was out of them. I was able to find a pendant kit at a local lighting store for $20, but I later found out that IKEA has them for only $5.

Table 1 (570x426)

A knowledgeable friend helped me hang it above my table. Isn’t it great?

table 2 (428x570)

Once that was installed, I knew the kitchen pendant needed to go. I started searching for something made of the same mercury glass, but couldn’t find anything I liked in my price range. Then I decided something with the same industrial feel would go nicely without feeling too matchy. After an extensive search, I found this simple glass cylinder at Home Depot.

After my prior lesson in hanging lights, I was able to install it myself with moderate supervision. The basic instructions that come with it are enough, and if you are a little nervous, I’m sure there are youtube videos out there that can help.

kitchen (421x570)

I like how they both have an industrial feel and are way more my style than the one that came with the place. Do you think they’re a good match?

Both (570x420)

Sarah

I love them. The glass cylinder would be way too modern for my place, but I love it over Sarah’s peninsula. And that mercury glass! Be still my beating heart! I am mildly obsessed with the stuff and am now racking my brain trying to think of a place for that pendant to live in my house. This isn’t the first time Sarah’s condo has made an appearance on my blog, so if you’d like to read more about her place be sure to check out this post from when she first bought the place, this one about framing out her bathroom mirror, and this one about some DIY art in her half bath. I hope y’all are having a fantastic Thursday. We are still sick over here. I brought Jack to the doctor Tuesday and it turns out he has a double ear infection! He’s amazingly cheerful for someone in his condition. I’m feeling a little stuffy and scratchy myself, but hopefully plenty of rest and cuddles (and antibiotics for him) will have both of us good as new in no time.

Share